|
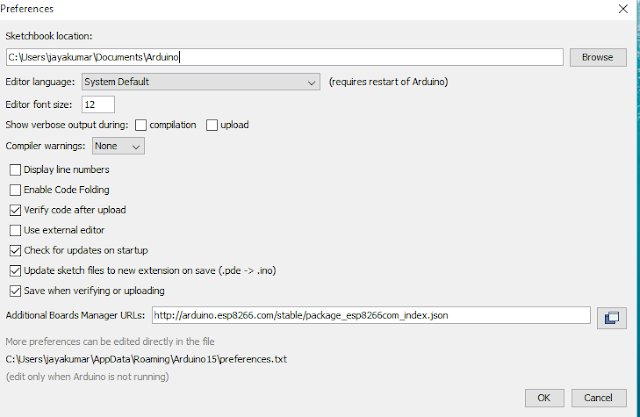
- Go to #File and click on the #Preference in the Arduino IDE
- copy the below code in the Additional boards Manager
http://arduino.esp8266.com/stable/package_esp8266com_index.json
|
- click OK to close the preference Tab.
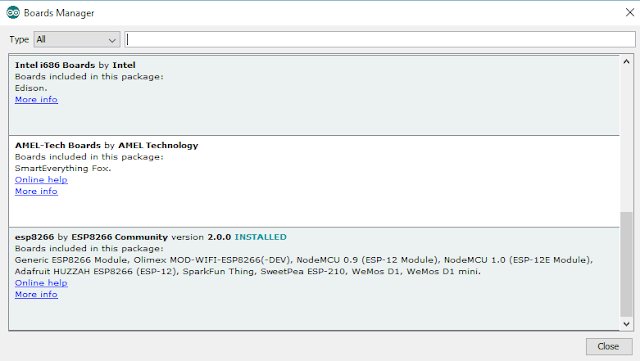
- then, go to Tools and board, and then select board Manager
- Navigate to esp8266 by esp8266 community and install the software for Arduino.
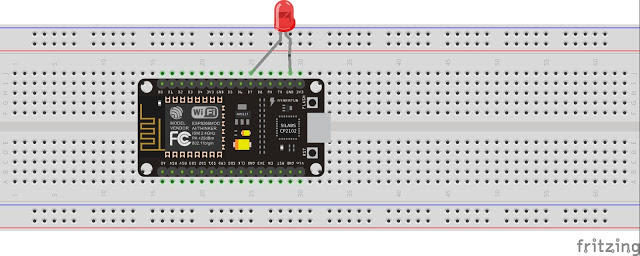
Once all the above process been completed we are read to program our esp8266 with Arduino IDE.
code
نسخ
اقتباس
عرض
تنزيل
								void setup() {
  // initialize digital pin 13 as an output.
  pinMode(13, OUTPUT);
}

// the loop function runs over and over again forever
void loop() {
  digitalWrite(13, HIGH);   // turn the LED on (HIGH is the voltage level)
  delay(1000);              // wait for a second
  digitalWrite(13, LOW);    // turn the LED off by making the voltage LOW
  delay(1000);              // wait for a second
}
code
نسخ
اقتباس
عرض
تنزيل
								/*
  Rui Santos
  Complete project details at https://RandomNerdTutorials.com/solved-reconnect-esp8266-nodemcu-to-wifi/

  Permission is hereby granted, free of charge, to any person obtaining a copy
  of this software and associated documentation files.

  The above copyright notice and this permission notice shall be included in all
  copies or substantial portions of the Software.
*/

#include <ESP8266WiFi.h>

// Replace with your network credentials
const char* ssid = \"REPLACE_WITH_YOUR_SSID\";
const char* password = \"REPLACE_WITH_YOUR_PASSWORD\";

unsigned long previousMillis = 0;
unsigned long interval = 30000;

void initWiFi() {
  WiFi.mode(WIFI_STA);
  WiFi.begin(ssid, password);
  Serial.print(\"Connecting to WiFi ..\");
  while (WiFi.status() != WL_CONNECTED) {
    Serial.print(\'.\');
    delay(1000);
  }
  Serial.println(WiFi.localIP());
  //The ESP8266 tries to reconnect automatically when the connection is lost
  WiFi.setAutoReconnect(true);
  WiFi.persistent(true);
}

void setup() {
  Serial.begin(115200);
  initWiFi();
  Serial.print(\"RSSI: \");
  Serial.println(WiFi.RSSI());
}

void loop() {
  //print the Wi-Fi status every 30 seconds
  unsigned long currentMillis = millis();
  if (currentMillis - previousMillis >=interval){
    switch (WiFi.status()){
      case WL_NO_SSID_AVAIL:
        Serial.println(\"Configured SSID cannot be reached\");
        break;
      case WL_CONNECTED:
        Serial.println(\"Connection successfully established\");
        break;
      case WL_CONNECT_FAILED:
        Serial.println(\"Connection failed\");
        break;
    }
    Serial.printf(\"Connection status: %d\\n\", WiFi.status());
    Serial.print(\"RRSI: \");
    Serial.println(WiFi.RSSI());
    previousMillis = currentMillis;
  }
}


