AS608 Fingerprint Reader Sensor
AS608 Fingerprint Reader Sensor Module Optical Fingerprint Fingerprint Module For Arduino Locks Serial Communication Interface
 125 ₪
125 ₪
AS608 Fingerprint to Arduino
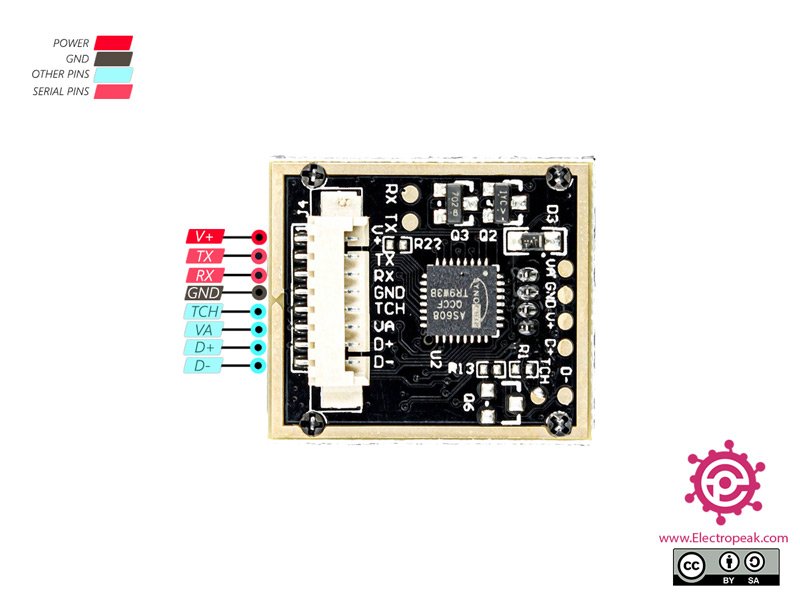
AS608 Optical Fingerprint Sensor Pinout
This Module has 4 useful pins:
► V+: Module power supply – 3.3V
► GND: Ground
► TX: Serial Transmitter
► RX: Serial Receiver
Interfacing AS608 Optical Fingerprint Sensor with Arduino
The following circuit show how you should connect Arduino to AS608 sensor. Connect wires accordingly.
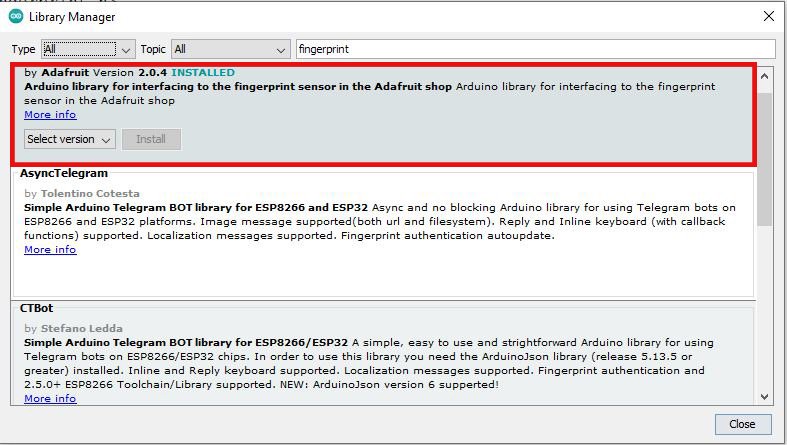
Step 2: Library
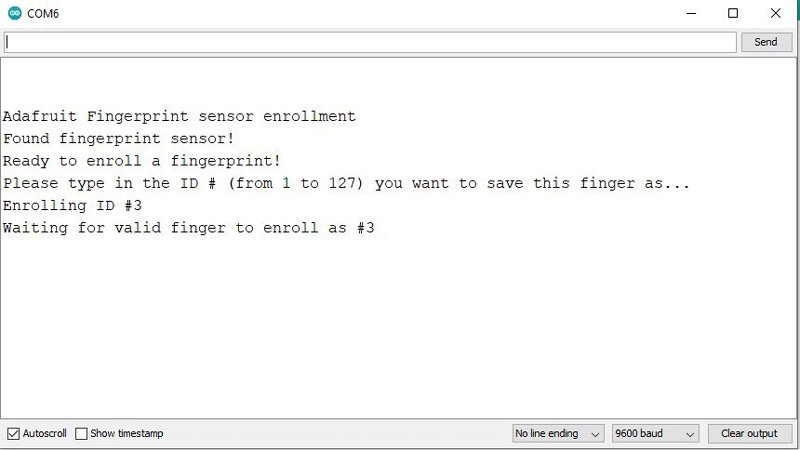
Step 3: Enrolling Fingerprint
The below program is for enrolling fingerprints. With this program you can enroll 127 different fingerprints. Run the program and open the Serial Monitor.
code
نسخ
اقتباس
عرض
تنزيل
								/*
  AS608-Optical-Fingerprint-Sensor-enroll
  Home
    based on Adafruit Library

*/
#include <Adafruit_Fingerprint.h>

SoftwareSerial mySerial(2, 3); // TX/RX

Adafruit_Fingerprint finger = Adafruit_Fingerprint(&mySerial);

uint8_t id;

void setup()
{
  Serial.begin(9600);
  while (!Serial);  // For Yun/Leo/Micro/Zero/...
  delay(100);
  Serial.println("nnAdafruit Fingerprint sensor enrollment");

  // set the data rate for the sensor serial port
  finger.begin(57600);

  if (finger.verifyPassword()) {
    Serial.println("Found fingerprint sensor!");
  } else {
    Serial.println("Did not find fingerprint sensor :(");
    //while (1) { delay(1); }
  }
}

uint8_t readnumber(void) {
  uint8_t num = 0;

  while (num == 0) {
    while (! Serial.available());
    num = Serial.parseInt();
  }
  return num;
}

void loop()                     // run over and over again
{
  Serial.println("Ready to enroll a fingerprint!");
  Serial.println("Please type in the ID # (from 1 to 127) you want to save this finger as...");
  id = readnumber();
  if (id == 0) {// ID #0 not allowed, try again!
     return;
  }
  Serial.print("Enrolling ID #");
  Serial.println(id);

  while (!  getFingerprintEnroll() );
}

uint8_t getFingerprintEnroll() {

  int p = -1;
  Serial.print("Waiting for valid finger to enroll as #"); Serial.println(id);
  while (p != FINGERPRINT_OK) {
    p = finger.getImage();
    switch (p) {
    case FINGERPRINT_OK:
      Serial.println("Image taken");
      break;
    case FINGERPRINT_NOFINGER:
      break;
    case FINGERPRINT_PACKETRECIEVEERR:
      Serial.println("Communication error");
      break;
    case FINGERPRINT_IMAGEFAIL:
      Serial.println("Imaging error");
      break;
    default:
      Serial.println("Unknown error");
      break;
    }
  }

  // OK success!

  p = finger.image2Tz(1);
  switch (p) {
    case FINGERPRINT_OK:
      Serial.println("Image converted");
      break;
    case FINGERPRINT_IMAGEMESS:
      Serial.println("Image too messy");
      return p;
    case FINGERPRINT_PACKETRECIEVEERR:
      Serial.println("Communication error");
      return p;
    case FINGERPRINT_FEATUREFAIL:
      Serial.println("Could not find fingerprint features");
      return p;
    case FINGERPRINT_INVALIDIMAGE:
      Serial.println("Could not find fingerprint features");
      return p;
    default:
      Serial.println("Unknown error");
      return p;
  }

  Serial.println("Remove finger");
  delay(2000);
  p = 0;
  while (p != FINGERPRINT_NOFINGER) {
    p = finger.getImage();
  }
  Serial.print("ID "); Serial.println(id);
  p = -1;
  Serial.println("Place same finger again");
  while (p != FINGERPRINT_OK) {
    p = finger.getImage();
    switch (p) {
    case FINGERPRINT_OK:
      Serial.println("Image taken");
      break;
    case FINGERPRINT_NOFINGER:
      break;
    case FINGERPRINT_PACKETRECIEVEERR:
      Serial.println("Communication error");
      break;
    case FINGERPRINT_IMAGEFAIL:
      Serial.println("Imaging error");
      break;
    default:
      Serial.println("Unknown error");
      break;
    }
  }

  // OK success!

  p = finger.image2Tz(2);
  switch (p) {
    case FINGERPRINT_OK:
      Serial.println("Image converted");
      break;
    case FINGERPRINT_IMAGEMESS:
      Serial.println("Image too messy");
      return p;
    case FINGERPRINT_PACKETRECIEVEERR:
      Serial.println("Communication error");
      return p;
    case FINGERPRINT_FEATUREFAIL:
      Serial.println("Could not find fingerprint features");
      return p;
    case FINGERPRINT_INVALIDIMAGE:
      Serial.println("Could not find fingerprint features");
      return p;
    default:
      Serial.println("Unknown error");
      return p;
  }

  // OK converted!
  Serial.print("Creating model for #");  Serial.println(id);

  p = finger.createModel();
  if (p == FINGERPRINT_OK) {
    Serial.println("Prints matched!");
  } else if (p == FINGERPRINT_PACKETRECIEVEERR) {
    Serial.println("Communication error");
    return p;
  } else if (p == FINGERPRINT_ENROLLMISMATCH) {
    Serial.println("Fingerprints did not match");
    return p;
  } else {
    Serial.println("Unknown error");
    return p;
  }

  Serial.print("ID "); Serial.println(id);
  p = finger.storeModel(id);
  if (p == FINGERPRINT_OK) {
    Serial.println("Stored!");
  } else if (p == FINGERPRINT_PACKETRECIEVEERR) {
    Serial.println("Communication error");
    return p;
  } else if (p == FINGERPRINT_BADLOCATION) {
    Serial.println("Could not store in that location");
    return p;
  } else if (p == FINGERPRINT_FLASHERR) {
    Serial.println("Error writing to flash");
    return p;
  } else {
    Serial.println("Unknown error");
    return p;
  }
}
The general process for enrolling a fingerprint is as follows:
1- Enter Fingerprint ID
2- Place finger on sensor
3- Place finger on the sensor again
1- Enter Fingerprint ID
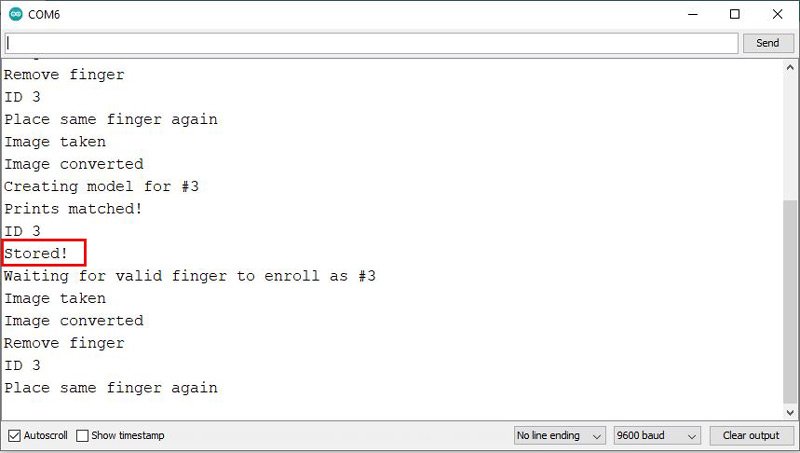
Before enrolling any fingerprint, you must first enter its ID. You are allowed to choose the number 1 to 127. For example, in the image below, we have selected number 3.
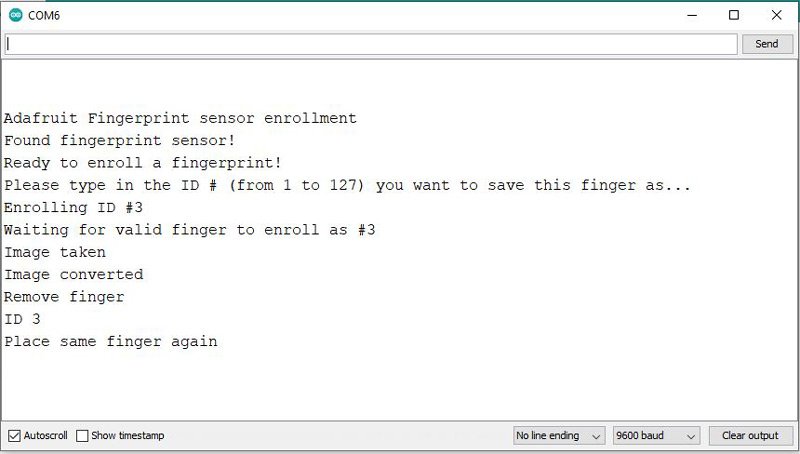
2- Place finger on sensor
3- Place finger on the sensor again
Now you have to put your finger on the sensor again for the second image. When this step is completed correctly, the phrase Stored will appear.
Step 4: Test and Verify fingerprint
First, upload the following code to Arduino.
code
نسخ
اقتباس
عرض
تنزيل
								/*
  AS608-Optical-Fingerprint-Sensor-enroll
    Modified on 06 Jan 2021
  by Amir Mohammad Shojaee @ Electropeak
  Home
    based on Adafruit Library

*/

#include <Adafruit_Fingerprint.h>

volatile int finger_status = -1;

SoftwareSerial mySerial(2, 3); // TX/RX on fingerprint sensor

Adafruit_Fingerprint finger = Adafruit_Fingerprint(&mySerial);

void setup()
{
  Serial.begin(9600);
  while (!Serial);  // For Yun/Leo/Micro/Zero/...
  delay(100);
  Serial.println("nnAdafruit finger detect test");

  // set the data rate for the sensor serial port
  finger.begin(57600);

  if (finger.verifyPassword()) {
    Serial.println("Found fingerprint sensor!");
  } else {
    Serial.println("Did not find fingerprint sensor :(");
    while (1) { delay(1); }
  }

  finger.getTemplateCount();
  Serial.print("Sensor contains "); Serial.print(finger.templateCount); Serial.println(" templates");
  Serial.println("Waiting for valid finger...");
}

void loop()                     // run over and over again
{
  finger_status = getFingerprintIDez();
  if (finger_status!=-1 and finger_status!=-2){
    Serial.print("Match");
  } else{
    if (finger_status==-2){
      for (int ii=0;ii<5;ii++){
        Serial.print("Not Match");
      }
    }
  }
  delay(50);            //don't ned to run this at full speed.
}

// returns -1 if failed, otherwise returns ID #
int getFingerprintIDez() {
  uint8_t p = finger.getImage();
  if (p!=2){
    Serial.println(p);
  }
  if (p != FINGERPRINT_OK)  return -1;

  p = finger.image2Tz();
  if (p!=2){
    Serial.println(p);
  }
  if (p != FINGERPRINT_OK)  return -1;

  p = finger.fingerFastSearch();
  if (p != FINGERPRINT_OK)  return -2;

  // found a match!
  Serial.print("Found ID #"); Serial.print(finger.fingerID);
  Serial.print(" with confidence of "); Serial.println(finger.confidence);
  return finger.fingerID;
}
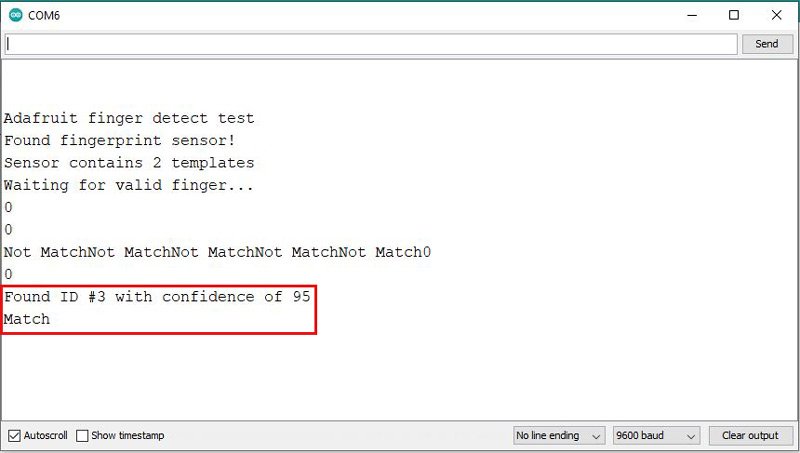
This code is for testing and matching fingerprints. First run the program and then open the Serial Monitor. At this point, the program waits for a finger to be placed on the sensor for identification. After placing the finger on the sensor, the phrase “Match” is displayed if the fingerprint is already stored, and phrase “Not Match” is displayed if fingerprint is not detected.
In addition, if fingerprint is identified, the corresponding ID will be specified.